How to Install UFO High Bay LED Lights
Installing UFO High Bay LED Lighting: A Professional Step-by-Step Guide
UFO high bay LED lights are a popular choice for illuminating large indoor areas such as warehouses, production halls, retail spaces, and sports facilities. With their signature circular design and compact profile, they offer powerful, energy-efficient lighting and are a reliable upgrade from traditional metal halide or fluorescent high bay fixtures.
In this guide, we'll provide a structured approach to installing UFO high bay LED lights with a focus on technical accuracy, safety, and efficiency.
Step 1: Choose the Right UFO High Bay Lighting
Before beginning installation, it’s essential to choose lights that match the scale and purpose of your space. Key technical criteria include:
-
Lumen Output: This measures brightness. For ceilings under 6 metres, plan for 10–20 lumens per square foot. For higher ceilings, 20–40 lumens per square foot may be required.
-
Power Rating (Wattage): Choose 100–150W for standard heights and 200–400W for taller ceilings. This ensures sufficient brightness without overconsumption.
-
Colour Temperature: Select between 3000K–4000K for warm, ambient lighting or 5000K–6500K for clear, daylight-style illumination.
-
Beam Angle: Narrow beams (60°–90°) provide concentrated lighting; wider beams (120°–150°) spread light across broader surfaces.
Refer to the product datasheet or consult with a lighting expert if unsure about the best configuration for your installation. 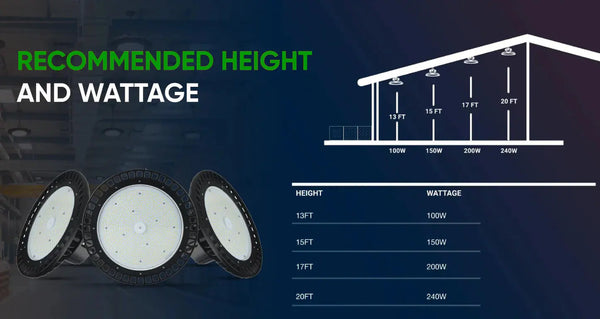
Step 2: Prepare Your Tools and Materials
Gather the necessary components and equipment before starting:
-
UFO high bay LED units (available on our website)
-
Mounting kits or brackets (included or sold separately)
-
Electrical wiring and connectors
-
Access equipment (ladder, lift)
-
Standard installation tools: drill, screwdrivers, pliers, wire stripper, tape, etc.
-
Safety gear (gloves, helmet, protective eyewear)
Step 3: Install Mounting Brackets or Hooks
-
Begin by ensuring the power is disconnected at the main panel. Use a voltage tester to confirm zero current before touching wiring.
If replacing old fixtures, remove them safely and disconnect the wiring. Dispose of them according to local environmental regulations.
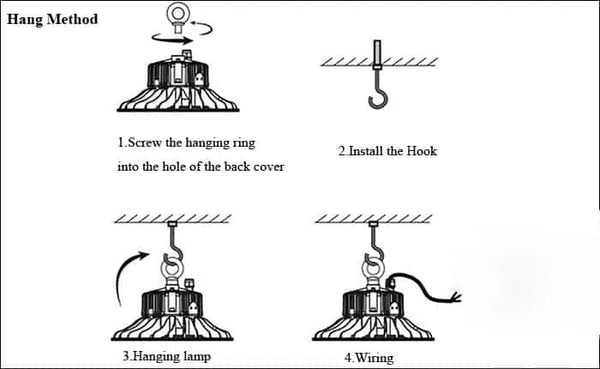
Mark the new mounting points accurately, considering fixture size and spacing. Drill pilot holes and attach brackets or hooks with appropriate fixings. Ensure everything is level and securely anchored.
Step 4: Install and Connect the LED Lights
Once the brackets are installed:
-
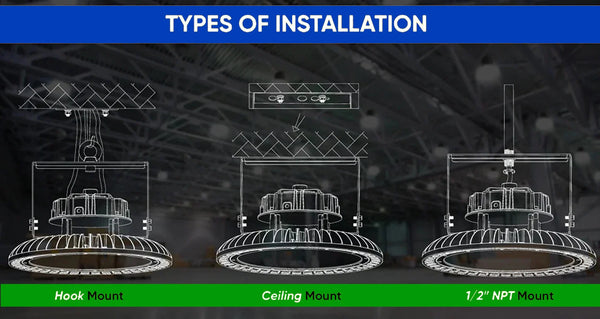
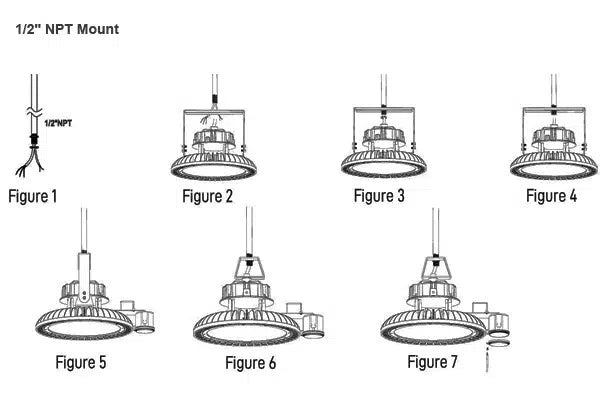
Mount the Fixtures: Depending on your mounting hardware, use either hook or eye-bolt suspension methods. Adjust hanging height as required.
-
Connect to Power: Follow the wiring diagram supplied. Whether you’re using a plug-in connection or hardwiring to mains, ensure that all connections are secure and compliant with safety standards. Use the correct gauge wire, connectors, and insulation.
-
Restore Power and Test: Switch the circuit back on and test the lights. Confirm even light distribution and proper colour temperature. If there’s flickering or no power, check connections and compatibility.

Congratulations — your UFO high bay LED lighting system is now operational. These lights are designed to offer excellent durability, high luminous output, and reduced maintenance in demanding commercial and industrial settings.